This blog outlines the technical steps required to integrate unit tests written in the Google Test framework with the code coverage analysis tool, Squish Coco.
We will see how you can get the code coverage for a full test suite (which is super easy) and also how to measure the coverage for each test case separately, which is only a little bit more complicated. No change is needed in the test cases, only a few lines of code must be added at the end of the test file.
What is Google Test?
Google Test is a unit test framework for C++ programs that belongs to the xUnit family of test frameworks. In such a framework, one writes the tests as test cases, which are arranged in test suites of similar tests.
Some of the features of Google Test include:
- An xUnit test framework.
- Test discovery.
- A rich set of assertions
- User-defined assertions
- Death tests
- Fatal and non-fatal failures
- Value-parameterized tests
- Type-parameterized tests
- Various options for running the tests
- XML test report generation
Google Test is used for unit tests of classes and functions. You write a test suite for the objects you want to test, and these and the test suite are compiled and linked to a test program that can be executed and then runs the tests.
Let's take an example
In order to show how Google Test works and how to integrate code coverage, we will now use a simple, but not completely trivial example. The task we will solve is the simplification of file paths.
- We write a function canonicalpath() that takes a Unix-style file path with parent directory references ("
..") and returns a version of the path with them removed. - A path "
abc/../de" is simplified to "de", while "../abc" is returned unchanged.
No other simplifications are made, and a slash at the end of a path is automatically removed, all to keep the code short. On the other hand, the function handles absolute and relative paths correctly, which makes the task nontrivial.
The Function canonicalpath()
The function canonicalpath() is defined in the file canonicalpath.cpp:
#include "canonicalpath.h"
#include <vector>
#include <regex>
#include <iostream>

std::string canonicalpath(const std::string &path)
{
    if (path.length() <= 1)
        return path;

     std::string sep = path[0] == '/' ? "/" : "";

     std::vector<std::string> entries;
     std::smatch match;
     std::regex re("[^/]+");
     for (auto p = path; std::regex_search(p, match, re); p = match.suffix()) {
          if (match.str() == ".." && !entries.empty()
              && !(sep == "" && entries.back() == ".."))
               entries.pop_back();
          else
               entries.push_back(match.str());
     }

     std::string cpath;
     for (auto s: entries) {
          cpath += sep + s;
          sep = "/";
     }
     return cpath;
}
There is also a file canonicalpath.h, but its content is clear.
The Unit Tests
Our tests are in a second file, canonicalpath_test.cpp:
#include "canonicalpath.h"
#include <gtest/gtest.h>

TEST(canonicalTests, relativePath) {
     EXPECT_STREQ(canonicalpath("abc/de/").data(), "abc/de");
     EXPECT_STREQ(canonicalpath("abc/../de").data(), "de");
     EXPECT_STREQ(canonicalpath("../../abc").data(), "../../abc");
     EXPECT_STREQ(canonicalpath("abc/../../../de").data(), "../../de");
     EXPECT_STREQ(canonicalpath("abc/../de/../fgh").data(), "fgh");
}

TEST(canonicalTests, absolutePath) {
     EXPECT_STREQ(canonicalpath("/abc/de/").data(), "/abc/de");
     EXPECT_STREQ(canonicalpath("/abc/../de").data(), "/de");
     EXPECT_STREQ(canonicalpath("/../../abc").data(), "/abc");
     EXPECT_STREQ(canonicalpath("/abc/../../../de").data(), "/de");
     EXPECT_STREQ(canonicalpath("/abc/../de/../fgh").data(), "/fgh");
}

TEST(canonicalTests, boundaryCase) {
     EXPECT_STREQ(canonicalpath("").data(), "");
     EXPECT_STREQ(canonicalpath("/").data(), "/");
}

int main(int argc, char **argv)
{
     ::testing::InitGoogleTest(&argc, argv);
     return RUN_ALL_TESTS();
}
This file contains a test suite with three test cases and a main() function.
The macro TEST has as its first parameter the name of a test suite, and as its second parameter, the name of a test case. The statements in braces after the macro are the test code. All statements in the test cases are comparisons (with EXPECT_STREQ) of the return value of canonicalpath() with an expected result. Since EXPECT_STREQ requires char* arguments but canonicalpath() returns a std::string, its return value is converted to char* with the member function data().
The three test cases contain tests for relative paths, absolute paths, and the boundary case of very short paths. By reading them you will now be able to understand better what canonicalpath() is exactly required to do.
There is also an explicit main() function in the program. In Google Test, not all test programs have it, because there is a library that provides an appropriate main() function. We will however later need to insert code into main() to use the full capabilities of Coco, therefore we provide it here already.
Compiling and Running the Test Program
Google Test is independent of any specific platform or compiler. Therefore, we do not give here compilation instructions for all systems — instead, we refer to the Google Test documentation. It contains recipes for several compilers and build systems.
Since, however, concrete examples are always helpful, let's look at the Unix case. There, a minimal Makefile to build and run the tests could look like this:
all: canonicalpath_tests
tests: all
     ./canonicalpath_tests

canonicalpath_tests: canonicalpath.o canonicalpath_tests.o
     g++ $^ -o $@ -lgtest -lpthread

clean:
     rm -f *.o
Which just compiles the two source files and links them with the right libraries.
[==========] Running 3 tests from 1 test case.
[----------] Global test environment set-up.
[----------] 3 tests from canonicalTests
[ RUN      ] canonicalTests.relativePath
[       OK ] canonicalTests.relativePath (1 ms)
[ RUN      ] canonicalTests.absolutePath
[       OK ] canonicalTests.absolutePath (1 ms)
[ RUN      ] canonicalTests.boundaryCase
[       OK ] canonicalTests.boundaryCase (0 ms)
[----------] 3 tests from canonicalTests (3 ms total)
[----------] Global test environment tear-down
[==========] 3 tests from 1 test case ran. (3 ms total)
[  PASSED  ] 3 tests.
With other build systems and platforms, the build will be different, but the output should be the same.
Integrating Code Coverage with Coco
Now we measure the code coverage for the tests and the program using Coco, a cross-platform and cross-compiler code coverage analysis for C, C++, SystemC, C#, Tcl, and QML code.
Coverage for the Whole Program
Once again, since Google Test is agnostic with respect to the platform and build system, we will not give much advice on how to instrument the code.
The Coco documentation contains instructions to instrument programs that are built under CMake, QMake, Visual Studio, MSBuild, Gnu Make, Microsoft NMake, and several other build systems -- so it should be possible to compile the tests with Coco enabled.
For Unix Makefiles, the easiest approach appeared already in one of our tutorials: we write a shell script that sets all environment variables that are needed to run a compilation with code coverage. The script is called instrumented, and in our case, it looks like this:
#! /bin/bash
export PATH=/opt/SquishCoco/wrapper/bin:$PATH
export COVERAGESCANNER_ARGS='--cs-on'
export COVERAGESCANNER_ARGS+=' --cs-exclude-file-abs-wildcard=*/canonicalpath_tests.cpp'

"$@"
With it, one can issue "./instrumented make clean tests" to rebuild the tests and run them again, this time with Coco. Two new files are then created: canonicalpath_tests.csexe and canonicalpath_tests.csmes. The first file contains the coverage measurements and the second one the data to interpret them. We will mostly speak of them as the .csexe and the .csmes file.
For other build systems, the details can be vastly different, but they always include the setting of CoverageScanner flags and a full recompilation. The flag --cs-on enables the code coverage (and is not needed in all setups), while --cs-exclude-file-abs-wildcard=*/canonicalpath_tests.cpp excludes the file with the test definitions from code coverage: only the code coverage of canonicalpath.cpp is meaningful.
(And on Windows systems, the names of the coverage files become canonicalpath_tests.exe.csexe and canonicalpath_tests.exe.csmes.)
Measuring Each Test Separately
With the current setup, we can get the code coverage of canonicalpath() for all tests of the test suite together. But we can even get the coverage for each test separately so that we can see for each piece of code by which tests it was run.
For this, we need to combine two features of Coco and Google Test.
- Coco provides library functions for every instrumented application. With them, the application can report the name of a test, its result, and the accumulated coverage measurements to the .csexe file.
- Google Test, on the other hand, has a TestEventListener class, which makes it possible to run specified pieces before and after each test and also to provide them with the name of the test and its result.
An Event Listener Class
To use these features, we must create a subclass of TestEventListener in canonicalpath_tests.cpp that calls the Coco library functions. We put the class definition at the end of the file, just before the main() function. This is the code of the class definition:
#ifdef __COVERAGESCANNER__

class CodeCoverageListener : public ::testing::TestEventListener
{
public:
    virtual void OnTestProgramStart(const ::testing::UnitTest&) {}
    virtual void OnTestIterationStart(const ::testing::UnitTest&, int) {}
    virtual void OnEnvironmentsSetUpStart(const ::testing::UnitTest&) {}
    virtual void OnEnvironmentsSetUpEnd(const ::testing::UnitTest&) {}
    virtual void OnTestCaseStart(const ::testing::TestCase&) {}
    virtual void OnTestPartResult(const ::testing::TestPartResult&) {}
    virtual void OnTestCaseEnd(const ::testing::TestCase&) {}
    virtual void OnEnvironmentsTearDownStart(const ::testing::UnitTest&) {}
    virtual void OnEnvironmentsTearDownEnd(const ::testing::UnitTest&) {}
    virtual void OnTestIterationEnd(const ::testing::UnitTest&, int) {}
    virtual void OnTestProgramEnd(const ::testing::UnitTest&) {}

    virtual void OnTestStart(const ::testing::TestInfo& test_info)
    {
        __coveragescanner_clear();
        std::string test_name = std::string(test_info.test_case_name())
             + '/' + std::string(test_info.name());
        __coveragescanner_testname(test_name.c_str());
    }

    virtual void OnTestEnd(const ::testing::TestInfo& test_info)
    {
        __coveragescanner_teststate("UNKNOWN");
        if (test_info.result()) {
             if (test_info.result()->Passed())
                  __coveragescanner_teststate("PASSED");
             if (test_info.result()->Failed())
                  __coveragescanner_teststate("FAILED");
        }
        __coveragescanner_save();
    }
};
#endif
The CodeCoverageListener class is surrounded by an #ifdef ... #endif block, so that it is only compiled when code coverage is enabled. (The symbol __COVERAGESCANNER__ is then automatically defined.)
For Coco, we only need implementations of the member functions OnTestStart and OnTestEnd. But since Google Test declares many member functions of TestEventListener as purely virtual, we have to provide implementations for all of them. The implementations of the unused functions appear -- compressed as much as possible -- in a block at the beginning of the class definition.
The function OnTestStart() first sets all coverage counters to zero, so that any previous activity of the program does not get recorded. Then it writes the name of the test to the .csexe file. In the implementation above, the name has the form "testsuite/testcase", but you can change it and define your own format. The slash, however, is important, since it is used by Coco to put tests into a hierarchical order.
OnTestStop() writes the test result to the .csexe file -- it can be "PASSED", "FAILED", or maybe "UNKNOWN".
The main() Function
The newly created class CodeCoverageListener must then be registered with Google Test. This is done in the main() function, which now looks like this:
int main(int argc, char **argv)
{
#ifdef __COVERAGESCANNER__
    ::testing::UnitTest::GetInstance()->listeners()
       .Append(new CodeCoverageListener);
#endif

    ::testing::InitGoogleTest(&argc, argv);
    return RUN_ALL_TESTS();
}
Coverage Results
Now the code must be recompiled and run again. Then the resulting .csmes and .csexe files can be loaded into Coco's CoverageBrowser. The result might then look like this:
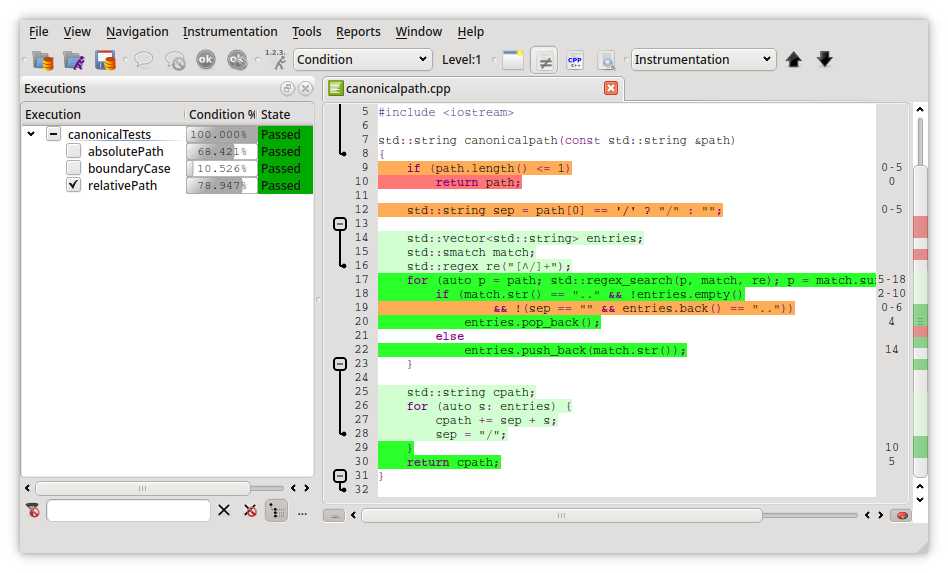
On the left, in the "Executions" window, you can see the names of the test suite and the test cases. I have chosen here a hierarchical view mode in which the test cases appear one level below the test suite -- the slash in the test names that were given to __coveragescanner_testname() makes this possible. At the right of it, there are the test results, which are always "PASSED".
With the coverage measurements separated by test cases, it's now possible to get the coverage just for one or more test cases. In the image, only the coverage for relativePath is selected.
In the same way as this demonstrative example, other Google Test projects can be instrumented and their code coverage measured.
Try Coco for free
Phew! That was a lot, huh? We hope this post was useful in understanding how Coco can help you provide full code coverage of unit test written in Google Test.
If you don't already utilize Coco, you can find our evaluation guide and your free download here.