Automating multiple applications built with different UI technologies requires multiple Squish editions and can be challenging. In this article, we would like to show you how to leverage a Squish IDE feature to handle testing of two different applications using two Squish servers in general, and how to do it from a single test case in particular. Let's get started.
Example Setup
In our example, we use Squish for Windows to automate a simple Windows application, as well as Squish for Web to automate a website, since this is a common setup. The Windows application is the address book example that is shipped with every Squish for Windows package, while Squish web presence is used as a testing website.
We assume that both Squish for Windows and Squish for Web are installed on the test machine and that a web browser extension of choice is configured and installed in Squish for Web.
Configuring multiple Squish servers
squishserver is the component that handles the communication with the Application Under Test (AUT). For our example setup, we will need two different squishservers to automate two AUTs with heterogeneous user interfaces (Windows and web). The ability to comfortably switch between two squishserver configurations therefore comes in handy.
In the past, working with such a setup used to be somewhat tedious. Not anymore: since Squish 7.1.0 (released in November 2022), Squish IDE can configure connection details of multiple squishservers and alternate between these configurations comfortably in the GUI.
We start the configuration of two squishservers for our example in Squish for Windows IDE. After opening Servers pane in IDE preferences ( Edit → Preferences → Squish → Servers), we can see one server has already been configured: this is the default Squish tools server, included in every Squish package.
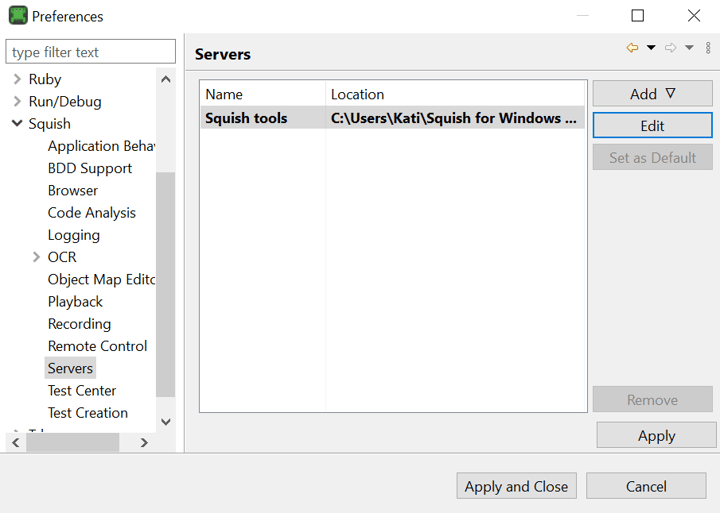
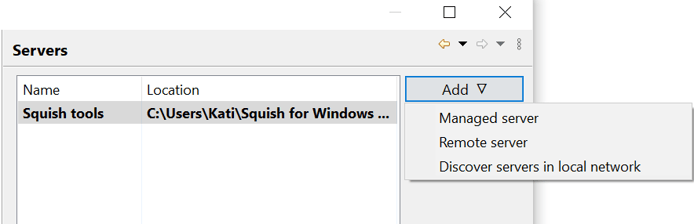
There are two kinds of connection to a squishserver we can choose to add here (using Add drop-down menu):
- Managed server: requires the user to specify a path to a folder with local installation of a Squish edition. Squish IDE takes care of starting and stopping this squishserver as needed.
- Remote server: requires the user to specify host or IP address and a port this server listens on. The host can be remote, but also a local one. Starting and stopping of this squishserver is the responsibility of the user.
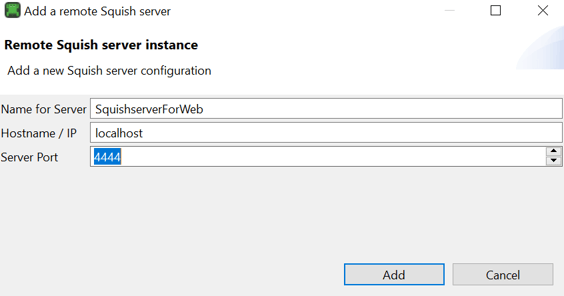
Choosing Remote server option from the drop-down, we add squishserver from Squish for Web edition as second server to our configuration and specify local hostname (alternatively an IP address) and a port.
We change into Squish for Web working directory and start the server from the command line:
> cd "C:\Users\Kati\Squish for Web 7.1.1\bin"
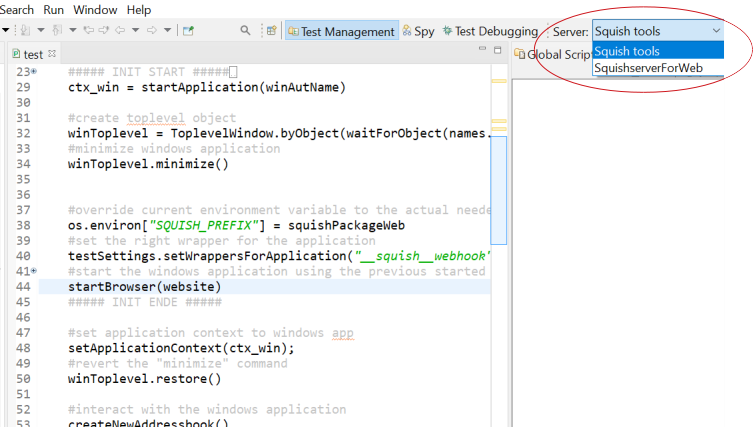
> squishserver.exe --port=4444One of the squishservers that is currently set as default is the server that is going to be used when recording and replaying in the IDE. The choice of default server can be changed from Squish IDE preferences as shown above (using Set as Default button), but for more comfortable access, we can activate Squish servers toolbar (Window → Customize Perspective →Toolbar visibility → Squish servers). This way, listbox with the selection of configured squishservers will be accessible from Squish IDE's main toolbar.
Using multiple Squish servers
Now we can record the first test case in Squish for Windows, in which we open a new address book and add one address. After refactoring, the code will look as follows:
#interact with the windows application

createNewAddressbook()
addEntry("Peter", "Burton", "pb@myemail.de", "0015655558765")

...

def createNewAddressbook():
    mouseClick(waitForObjectItem(names.address_Book_Unnamed_Menubar, "File"))
    mouseClick(waitForObjectItem(names.file_MenuItem, "New"))

def addEntry(forename, surname, email, phone):
    mouseClick(waitForObject(names.add_ToolbarItem))
    type(waitForObject(names.address_Book_Add_Forename_Edit), forename)
    type(waitForObject(names.address_Book_Add_Surname_Edit), "<Tab>")
    type(waitForObject(names.address_Book_Add_Surname_Edit), surname)
    type(waitForObject(names.address_Book_Add_Email_Edit), "<Tab>")
    type(waitForObject(names.address_Book_Add_Email_Edit), email)
    type(waitForObject(names.address_Book_Add_Phone_Edit), "<Tab>")
    type(waitForObject(names.address_Book_Add_Phone_Edit), phone)
    clickButton(waitForObject(names.address_Book_Add_OK_Button))
Using the toolbar configured in the previous step, we set squishserver from Web edition (identified as SquishserverForWeb) as the default one. We are now ready to start recording second test case -- a simple interaction with qt.io website in a browser. After refactoring, the code will look as follows:
#interact with the browser

setApplicationContext(ctx_web);
startSquishTrial()

def startSquishTrial():
    clickLink(waitForObject(names.quality_Assurance_Software_Tools_Cross_Platform_Testing_Qt_Squish_A))
    clickLink(waitForObject(names.squish_GUI_Test_Automation_Quality_Assurance_Start_your_free_trial_A))
Putting it all together: in one test case
We will now join the two snippets we recorded with Squish for Windows and Squish for Web into a single test case. After starting the Windows AUT, we need to change the environment variable SQUISH_PREFIX to be able to execute test script commands from a different Squish edition (Web in our case).
squishPackageWeb = "C:\\Users\\Kati\\Squish for Web 7.1.1"os.environ["SQUISH_PREFIX"] = squishPackageWeb
Next, we set Squish wrapper to Web and start __squish__webhook as the AUT so we can launch a browser and inject our hook mechanism.
website = "https://www.qt.io/product/quality-assurance/"

testSettings.setWrappersForApplication( "__squish__webhook", ["Web"] )
ctx_web = startApplication( "__squish__webhook", localhost, 4444 )
startBrowser( website )
For switching between the Windows desktop application and the web browser, two additional things are needed:
- Application Context: to send any kind of commands (e.g. button press, typing, etc.) to the right application
ctx_win = startApplication( "Addressbook" )
setApplicationContext( ctx_win );

# interact with Windows AUT

setApplicationContext(ctx_web );

# interact with qt.io website - Toplevel API: as sending commands to an application that doesn't have input focus can be problematic, Squish provides so called Toplevel API which can be used to bring an application window into foreground, set input focus to it or minimize/maximize it
In our example, we use Toplevel API to minimize and restore Windows application window. We leave the browser window as is.winToplevel = ToplevelWindow.byObject(waitForObject(names.address_Book_Unnamed_Window))
winToplevel.minimize()
You can download the full test suite with the example above here .
Conclusion
The ability of Squish IDE to handle configuration of multiple Squish servers can be used in a heterogeneous testing environment featuring AUTs developed with different UI toolkits, distributed across multiple local and remote hosts or devices. Switching between these servers can be now done comfortably from a single instance of Squish IDE.
Automating multiple heterogeneous AUTs is possible from a single test case too, but comes at a price of more complex test script featuring less straightforward AUT start and one or more application context switches.
For a limited number of toolkit combinations, support for automating AUTs built with both toolkits can be bundled into a single custom Squish binary package. For other combinations, this is not an option and building Squish from source code can be an alternative. Please reach out to the Squish support team with the details of your testing environment setup to find out what is possible in your case.