Today we will demonstrate some tips and tricks to using the Squish 'Visual Verification Point Editor'
...and how it can be used by developers and testers even if they're not using the Squish IDE. Or even if they're not using the Squish built-in interpreters at all (if using the squishtest Python import module, for example) .
Visual VP's Can Be Created Easily from Test Scripts
...with no need for using the Squish IDE or even the Squish script interpreter at all (for example, when Squish is used as a Python import module in regular Python scripts).
For creating a Visual Verification Point from a test script which verifies all GUI elements currently visible on the AUT's main window, simply add the following lines:
...createVisualVP( "VP1", names.MainWindow )# test.vp( "VP1" )...
...and let the test script run. The test now dumps the object hierarchy of the main window, containing any visible controls, as well as screenshots and properties of these controls all together as one single 'Visual Verification Point' file into the test's data folder.
Once the test has run and has recorded the main window in it's state at that moment when 'createVisualVP()' was called, the lines can now be changed to make the test verify on this position in the script:
...# createVisualVP( "VP1", names.MainWindow )test.vp( "VP1" )...
Now, when the test script runs these lines, it will verify the whole main window's control elements against the just taken dataset stored as 'VP1.'
Using the Editor from the Command Line
This perhaps sounds a little impractical, (since, when just one property of one control element may change, or when one control element may change position from one software version to another, the complete verification would then fail) but in these cases, the VisualVPeditor can be used for further investigating the failure. By command line, type:
visualVPeditor --expected <VPfile> --actual <pathToResultData>
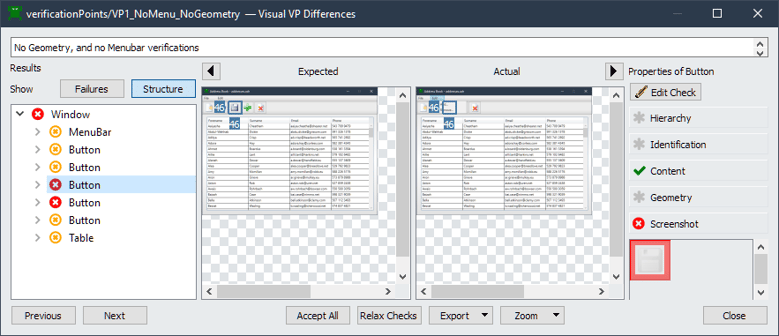
The VisualVPEditor will show up. - The GUI hierarchy tree of the verification point data set can be browsed for concrete errors. If used during test development, these verifications can be adjusted (or even disabled) for making the verification pass under such distinct circumstances. These verifications can also be used either just to save to the existing 'expected' VP set or to store as a new, different VP set with a different name. This is discussed in the following section.
So different data sets can be derived from that VP (which contains verification for the complete window) which we've taken in the first place, which can be stored as modified versions now, having distinct sub groups of element verifications enabled or disabled.
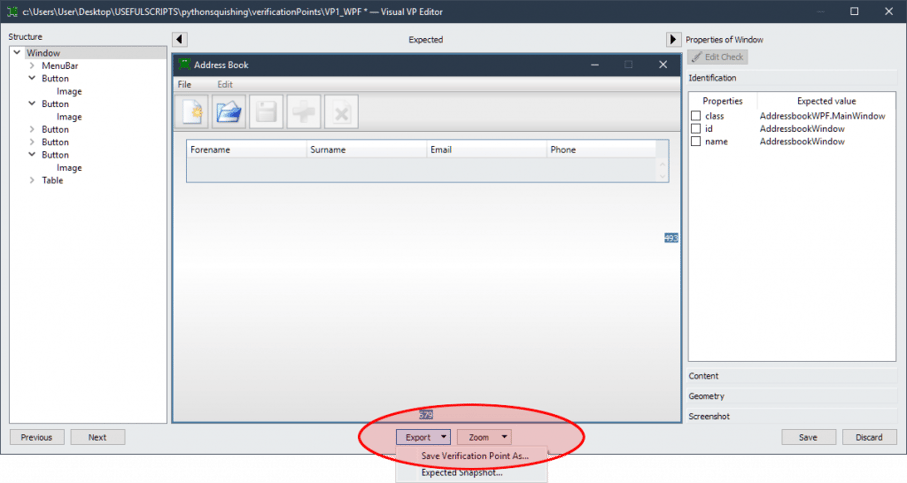
The VP Editor now can be used for 'tuning' our VP data. Enabling or disabling of complete, distinct branches of the window's GUI tree is possible (if there are known fluctuations in properties, for example). What's also possible is enabling or disabling complete categories of verifications in general, which affects all objects within the VP, like:
- (Screenshot Check) disabling / enabling any kind of screenshot verification at all.
- (Geometry Check) disabling / enabling any kind of positional verification at all.
- (Hierarchy Check) disabling / enabling any kind of hierarchical verification at all.
- (Content Check) disabling / enabling any kind of verification of content properties at all.
Also 'fine tuning' on a much more detailed grain is possible: like disabling text property verification of some distinct text label down the left corner of the second group box from the right side of the window (because text may be inconsistent and might change at each start of the application, like a date/time view.) Such things can be 'blanked' out from the verification then.
Related sources: